Canvas除了能绘制基础集合图形, 绘制图片以外, 还有一个非常重要, 同时也相对复杂一点的功能 – 绘制文字.
drawText 之 Canvas
canvas中关于绘制文字的方法
public void drawText(@NonNull String text, float x, float y, @NonNull Paint paint)
// start 和 end 用于控制绘制文字的个数
public void drawText(@NonNull String text, int start, int end, float x, float y, @NonNull Paint paint)
public void drawText(@NonNull CharSequence text, int start, int end, float x, float y, @NonNull Paint paint)
public void drawText(@NonNull char[] text, int index, int count, float x, float y, @NonNull Paint paint)
// 将文字绘制到路径上
// hOffset 和 vOffset 分别指文字相对于 Path 的水平偏移量 和 竖直偏移量
public void drawTextOnPath(@NonNull String text, @NonNull Path path, float hOffset, float vOffset, @NonNull Paint paint)
public void drawTextOnPath(@NonNull char[] text, int index, int count, @NonNull Path path, float hOffset, float vOffset, @NonNull Paint paint)
源码中关于 x, y 的解释
上面这些方法的功能, 还有其它参数的作用, 都比较容易理解. 其中 (x, y) 这两个参数需要重点关注. 根据以往的经验, 比如绘制点的时候, (x, y)就是点的坐标, 绘制矩形的时候, (x, y)表示矩形左上角的坐标. 那么这里的 (x, y) 是指所绘制文本所在矩形的左上角吗? 实际上并不是, 看看源码里面的注释:
/**
 * @param x The x-coordinate of the origin of the text being drawn    -> 所绘制文本原点的X坐标
 * @param y The y-coordinate of the baseline of the text being drawn  -> 所绘制文本基线的Y坐标
 */
public void drawText(@NonNull String text, float x, float y, @NonNull Paint paint) {
    super.drawText(text, x, y, paint);
}
关于X还比较好理解, 就是文字原点的水平坐标, 那么基线是什么? 下面就用一个的小案例说明什么是基线:
绘制基线
定义一个View, 在 onDraw 方法中绘制一段文字, 和两条直线
public class TestTextView extends View {
    ...
    @Override
    protected void onDraw(Canvas canvas) {
        // 测试代码, 实际开发最好不要在这里创建对象
        Paint paint = new Paint(Paint.ANTI_ALIAS_FLAG | Paint.DITHER_FLAG);
        paint.setColor(0xff000000);
        // 字体大小, 单位 px
        paint.setTextSize(45);
        float x = 540;
        float y = 500;
        // 绘制文字
        canvas.drawText("汉字 English 906", x, y, paint);
        paint.setColor(0xffff0000);
        // 绘制经过 (x, y) 的垂直线
        canvas.drawLine(x, 400, x, 520, paint);
        // 绘制经过 (x, y) 的水平线, 即上面这些文字的基线
        canvas.drawLine(80, y, 1000, y, paint);
    }
}
效果如下:
可以看出, x即表示文字原点的水平坐标. 仔细看会发现x离第一个文字中间还有一段缝隙, 这是为了美观, 所以文字所占的实际宽度要略大于显示出来的宽度;
而基线的位置, 用文字描绘起来可能不太容易. 可以回忆一下小时候的 拼音本

drawText 之 Paint(一) – 设置文字显示效果
Paint可以辅助我们进行文字的绘制
设置文字的显示效果
// 设置字体大小 单位 px
public void setTextSize(float textSize)
// 是否加粗
public void setFakeBoldText(boolean fakeBoldText)
// 设置文字删除线
public void setStrikeThruText(boolean strikeThruText)
// 设置文字下划线
public void setUnderlineText(boolean underlineText)
// skewX 一般取 (-1, 1)  负数右倾
public void setTextSkewX(float skewX)
// 设置文字水平拉伸
public void setTextScaleX(float scaleX)
// 设置单词间距
public void setWordSpacing(float wordSpacing)
// 设置字符间距. 默认值是 0  (实际上文字占用的宽度比显示出来的要宽一点, 表现形式为及时设置了0, 字符间还是有一定缝隙, 这是为了美观)
public void setLetterSpacing(float letterSpacing)
// 设置文字所在地区
public void setTextLocale(@NonNull Locale locale)
public void setTextLocales(@NonNull @Size(min=1) LocaleList locales)
// 设置文字水平对齐方式:  Align.LEFT  Align.CETNER  Align.RIGHT
public void setTextAlign(Align align)
// 设置字体
public Typeface setTypeface(Typeface typeface)
文字水平对齐
通过 paint.setTextAlign(), 可以设置文字的对齐方式. 参数 Align 是一个枚举
public enum Align {
    /**
     * The text is drawn to the right of the x,y origin  -> 文本绘制在(x,y)原点的右侧
     */
    LEFT    (0),
    /**
     * The text is drawn centered horizontally on the x,y origin -> 文本在(x,y)原点水平居中绘制
     */
    CENTER  (1),
    /**
     * The text is drawn to the left of the x,y origin -> 文本绘制在(x,y)原点的左侧
     */
    RIGHT   (2);

    private Align(int nativeInt) {
        this.nativeInt = nativeInt;
    }
    final int nativeInt;
}
分别看一下三种对齐方式的区别:
- Align.LEFT

- Align.CENTER

- Align.RIGHT

此时, 可以重新描述一下 (x, y) :
(x, y) 是文字的原点坐标. 通过 paint.setTextAlign() 可以设置文字相对于原点的水平对齐方式. y 所在的水平线, 即文字的基线.
设置字体
通过 paint.setTypeface() 可以设置字体
- 系统已经提供了几个字体常量
Typeface.DEFAULT_BOLD // Typeface.SANS_SERIF // Typeface.SERIF // Typeface.MONOSPACE // - 通过字体名称创建系统内置的字体
// style 值字体风格, 取值范围如下 // Typeface.NORMAL 普通风格 // Typeface.BOLD 加粗 // Typeface.ITALIC 倾斜 // Typeface.BOLD_ITALIC 加粗 & 倾斜 public static Typeface create(String familyName, @Style int style) // 案例 Typeface typeface = Typeface.create("宋体", Typeface.NORMAL); - 自定义字体
效果如下:// 通过 assets 创建字体 public static Typeface createFromAsset(AssetManager mgr, String path) // 通过字体文件路径创建爱你字体 public static Typeface createFromFile(@Nullable String path) public static Typeface createFromFile(@Nullable File file) // 案例 (字体文件所在路径: assets/font/一腔诗意体.ttf) Typeface typeface = Typeface.createFromAsset(getContext().getAssets(), "fonts/一腔诗意体.ttf");
drawText 之 Paint(二) – 测量文字尺寸
FontMetrics
FontMetrics 类用来描述文字的区域范围. Paint中定义了获取 FontMetrics 的方法
// 每次调用返回新的对象
public FontMetrics getFontMetrics()
// 计算结果填进传入的 FontMetrics, 频繁调用时性能好一点
public float getFontMetrics(FontMetrics metrics)
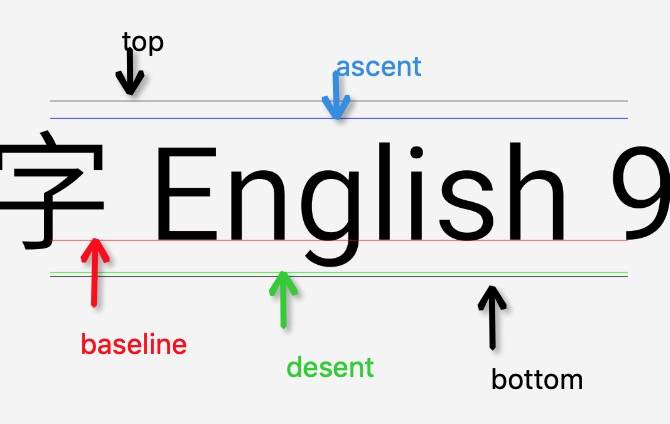
FontMetrics 中包含以下几个变量:
public static class FontMetrics {
    /**
     * 文字可以绘制的最高高度 离 baselien 的垂直距离:  负值
     * top = top线的y坐标 - baseline线的y坐标   =>   top线Y坐标 = baseline线的y坐标 + fontMetric.top
     */
    public float   top;
    /**
     * 系统推荐的, 绘制文字时的最高高度 离 baselien 的垂直距离:  负值
     * ascent = ascent线的y坐标 - baseline线的y坐标   =>   ascent线Y坐标 = baseline线的y坐标 + fontMetric.ascent
     */
    public float   ascent;
    /**
     * 系统推荐的, 绘制文字时的最低高度 离 baselien 的垂直距离:  正值
     * descent = descent线的y坐标 - baseline线的y坐标  =>   descent线Y坐标 = baseline线的y坐标 + fontMetric.descent
     */
    public float   descent;
    /**
     * 文字可以绘制的最低高度 离 baselien 的垂直距离:  正值
     * bottom = bottom线的y坐标 - baseline线的y坐标  =>   bottom线Y坐标 = baseline线的y坐标 + fontMetric.bottom
     */
    public float   bottom;
    /**
     * 行的额外间距, 上一行的 bottom 和 下一行的 top 的间距
     */
    public float   leading;
}
top, ascent, descent, bottom 这四个变量所代表的水平线, 位置如下:
这四条线的作用: ascent ~ descent 之间的区域是系统推荐的安全范围, 我们在绘制文字时, 尽量在这个范围内完成, 这样不管是哪个地区的文字, 都能够正常的展示. top ~ bottom则表示绘制文字时理论上可以允许的最大范围, 超过这个范围的部分会被裁剪.
获取行距
// 获取两行文字, baselien的间距 (手动进行文字换行时, 可能会有用)
public float getFontSpacing()
获取文字的宽高
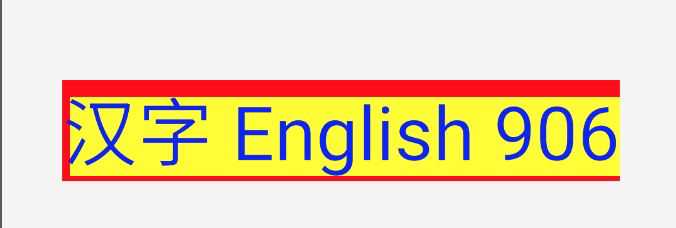
代码如下:
String text = "汉字 English 906";
Paint paint = new Paint(Paint.ANTI_ALIAS_FLAG | Paint.DITHER_FLAG);
paint.setTextSize(100);
paint.setTextAlign(Paint.Align.CENTER);
// 原点
int x = 540, y = 500;
Rect mRect = new Rect();
// FontMetricsInt 和 FontMetrics 基本一样, 只是它里面的变量类型为 int
Paint.FontMetricsInt fontMetrics = paint.getFontMetricsInt();
int bottom = y + fontMetrics.bottom;
int top = y + fontMetrics.top;
// ② 文字实际所占高度即 bottom 和 top 之间的距离
int height = bottom - top;
// ③ 文字实际所占宽度通过 paint.measureText() 方法获取
int width = (int) paint.measureText(text);
// 因为设置了水平居中对齐
mRect.left = x - width / 2;
mRect.right = x + width / 2;
mRect.top = top;
mRect.bottom = bottom;
paint.setColor(Color.RED);
// 绘制文字实际所占的范围
canvas.drawRect(mRect, paint);
// ① 通过 paint.getTextBounds() 获取包裹文字的最小矩形范围
// 该矩形是以 (0,0)为原点计算出来的, 需要对齐做下平移, 才能找到文字真正所在的位置
paint.getTextBounds(text,0,text.length(),mRect);
// 通过平移, 找到真正的位置
int minWidth = mRect.width();
// 因为设置了文字水平居中对齐, 而 getTextBounds() 默认是按照 Align.LEFT 处理的
mRect.left = mRect.left + x - minWidth / 2;
mRect.right = mRect.left + minWidth;
mRect.top += y;
mRect.bottom += y;
paint.setColor(Color.YELLOW);
// 绘制最小矩形范围
canvas.drawRect(mRect, paint);
paint.setColor(Color.BLUE);
// 绘制文字
canvas.drawText(text, x, y, paint);
效果如下:
一些可能有用的方法
/**
 * 根据指定宽度截留文字
 * @param text  The text to measure. Cannot be null.
 * @param measureForwards:  文字的测量方向,true 表示由左往右测量
 * @param maxWidth:         允许的最大宽度
 * @param measuredWidth:    可选的。如果不为空,则返回测量的实际宽度
 * @return 返回值是截留的文字个数(如果宽度没有超限,则是文字的总个数)
 */
public int breakText(String text, boolean measureForwards, float maxWidth, float[] measuredWidth)
/**
 * 检查字符串是否是一个单独的字形(单个字符, 或者unicode, 或者表情符号)
 */
public boolean hasGlyph(String string)
StaticLayout
drawText() 方法是不会换行的, 虽然可以配合 paint.breakText() 将字符串分割后分别绘制, 但这种方式效率并不高. StaticLayout 就是一个用于处理文字换行的工具类. 使用StaticLayout可以超出 宽度限制, 或者遇到 \n 时自动换行.
- StaticLayout 的构造方法
public StaticLayout(CharSequence source, // 需要换行的字符串 TextPaint paint, // paint int width, // 文字绘制区域的宽度, 超出这个宽度会自动换行 Alignment align, // 文字对齐方式: ALIGN_NORMAL, ALIGN_OPPOSITE, ALIGN_CENTER float spacingmult, // 行间距的倍数,通常情况下填 1 就好; float spacingadd, // 行间距的额外增加值,通常情况下填 0 就好; boolean includepad) // 是否在文字上下添加额外的空间(留白),来避免某些过高的字符的绘制出现越界 public StaticLayout(CharSequence source, int bufstart, // source 的起始位置 int bufend, // source 的结束位置 TextPaint paint, int outerwidth, Layout.Alignment align, float spacingmult, float spacingadd, boolean includepad) public StaticLayout(CharSequence source, int bufstart, int bufend, TextPaint paint, int outerwidth, Layout.Alignment align, float spacingmult, float spacingadd, boolean includepad, TextUtils.TruncateAt ellipsize, // 文字无法全部显示时, 省略的方式 int ellipsizedWidth) // 省略的宽度 - StaticLayout 的用法
// staticLayout 默认画在Canvas的(0,0) 坐标处. 只能通过 canvas.translate(x,y) 调整位置
staticLayout.draw(canvas);


