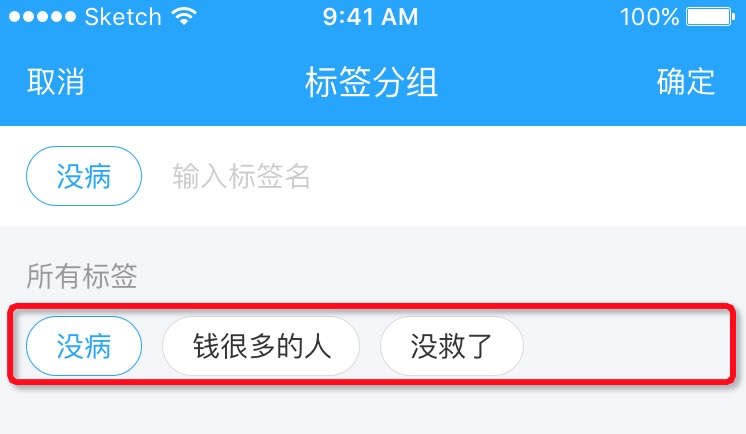
在 自定义View(1)-测量中已经讲过 onMeasure, 而onLayout的内容也不多. 因此下面结合二者, 通过几个实际案例说明它们的作用.
onLayout
onLayout 是 ViewGroup中的一个抽象方法, 因此所有的自定义ViewGroup都需要实现它
protected abstract void onLayout(boolean changed, int l, int t, int r, int b);
案例–流式布局(FlowLayout)

要求如上, 假设现在要用一个容器来存放一组标签, 标签的数量, 长度都不定, 要求是从左向右摆放, 一行放不下就换行. 显然这个功能需要通过一个自定义ViewGroup来实现.
添加必要的自定义属性
<?xml version="1.0" encoding="utf-8"?>
<resources>
    <declare-styleable name="FlowLayout">
        <!-- 水平间距 -->
        <attr name="columnSpace" format="dimension" />
        <!-- 垂直间距 -->
        <attr name="rowSpace" format="dimension" />
        <!-- 最大行数 -->
        <attr name="maxLines" format="integer" />
</declare-styleable>
</resources>
FlowLayout
public class FlowLayout extends ViewGroup {
    protected int columnSpace, rowSpace, maxLines;
    public FlowLayout(Context context) {
        this(context, null);
    }
    public FlowLayout(Context context, AttributeSet attrs) {
        this(context, attrs, 0);
    }
    public FlowLayout(Context context, AttributeSet attrs, int defStyleAttr) {
        super(context, attrs, defStyleAttr);
        // 读取自定义属性
        TypedArray a = context.obtainStyledAttributes(attrs, R.styleable.FlowLayout);
        columnSpace = a.getDimensionPixelSize(R.styleable.FlowLayout_columnSpace, dip2px(10));
        rowSpace = a.getDimensionPixelSize(R.styleable.FlowLayout_rowSpace, dip2px(5));
        maxLines = a.getInt(R.styleable.FlowLayout_maxLines, 0);
        a.recycle();
    }
    public int dip2px(float dpValue) {
        final float scale = getContext().getResources().getDisplayMetrics().density;
        return (int) (dpValue * scale + 0.5f);
    }
    // 测量
    @Override
    protected void onMeasure(int widthMeasureSpec, int heightMeasureSpec) {
        super.onMeasure(widthMeasureSpec, heightMeasureSpec);
        int pl = getPaddingLeft();
        int pt = getPaddingTop();
        int pr = getPaddingRight();
        int pb = getPaddingBottom();
        int lines = 1,
        int lineHeight = 0;
        int left = pl;
        int top = pt;
        // 获得容器宽度
        int width = resolveSize(getMeasuredWidth(), widthMeasureSpec);
        int childCount = getChildCount();
        View child;
        int childWidth;
        int childHeight;
        for (int i = 0; i < childCount; i++) {
            child = getChildAt(i);
            // 测量子View
            measureChild(child, widthMeasureSpec, heightMeasureSpec);
            childWidth = child.getMeasuredWidth();
            childHeight = child.getMeasuredHeight();
            // 计算行高
            lineHeight = Math.max(childHeight, lineHeight);
            // 如果当前行剩余宽度不够用了, 就换行
            if (left + childWidth > width - pr) {
            // 如果设置了最大行数, 则控制不要超过 maxLines
                if (maxLines > 0 && ++lines > maxLines) {
                    break;
                }
                // 重置 left
                left = pl;
                // top 加上 行高 和 行间距
                top += lineHeight + rowSpace;
                lineHeight = childHeight;
            }
            // 没算完一个子View,  left 加上 childWidth 和 列间距
            left += childWidth + columnSpace;
        }
        // 计算自己的宽高, 并通过 setMeasuredDimension 保存
        if (childCount == 0) {
            setMeasuredDimension(width, 0);
        } else {
            setMeasuredDimension(width, resolveSize(top + lineHeight + pb, heightMeasureSpec));
        }
    }
        // 布局
    @Override
    protected void onLayout(boolean changed, int l, int t, int r, int b) {
        int pl = getPaddingLeft();
        int pr = getPaddingRight();
        int lines = 1;
        int lineHeight = 0;
        int left = pl;
        int top = getPaddingTop();
        int width = r - l;
        View child;
        int childWidth;
        int childHeight
        for (int i = 0, end = getChildCount(); i < end; i++) {
            child = getChildAt(i);
            childWidth = child.getMeasuredWidth();
            childHeight = child.getMeasuredHeight();
            lineHeight = Math.max(childHeight, lineHeight);
            if (left + childWidth > width - pr) {
            if (maxLines > 0 && ++lines > maxLines) {
            break;
            }
            left = pl;
            top += lineHeight + rowSpace;
            lineHeight = childHeight;
        }
        // 对子View进行布局
        child.layout(left, top, left + childWidth, top + childHeight);
        left += childWidth + columnSpace;
        }
    }
        // 保存状态
    @Override
    protected void onRestoreInstanceState(Parcelable state) {
        FlowState ss = (FlowState) state;
        super.onRestoreInstanceState(ss.getSuperState());
        columnSpace = ss.columnSpace;
        rowSpace = ss.rowSpace;
        maxLines = ss.maxLines;
    }
    // 恢复状态
    @Override
    protected Parcelable onSaveInstanceState() {
        FlowState state = new FlowState(super.onSaveInstanceState());
        state.columnSpace = columnSpace;
        state.rowSpace = rowSpace;
        state.maxLines = maxLines;
        return state;
    }
    public <T> void setData(List<T> list, @NonNull Delegate delegate){
        if(list == null || list.isEmpty()){
            removeAllViews();
        }else {
            // 已有几个子view
            int childCount = getChildCount();
            // 需要几个子view
            int size = list.size();
            // 复用
            if(size > childCount){
                // 补充缺少的数量
                for (int i = childCount; i < size; i++) {
                    addView(delegate.initItem(getContext(), i, null));
                }
                }else if(size < childCount){
                // 删除多余的数量
                for (int i = childCount - 1; i >= size; i--) {
                    removeViewAt(i);
                }
            }
            int max = Math.min(childCount, size);
            for (int i = 0; i < max; i++) {
                delegate.initItem(getContext(), i, getChildAt(i));
            }
            }
    }
    public interface Delegate{
        View initItem(Context context, int index, @Nullable View view);
    }
    private static class FlowState extends BaseSavedState {
        public static final Creator<FlowState> CREATOR = new Creator<FlowState>() {
            @Override
            public FlowState createFromParcel(Parcel source) {
                return new FlowState(source);
            }
            @Override
            public FlowState[] newArray(int size) {
                return new FlowState[size];
            }
        };
        int columnSpace, rowSpace, maxLines;
        FlowState(Parcel source) {
            super(source);
            columnSpace = source.readInt();
            rowSpace = source.readInt();
            maxLines = source.readInt();
        }
        FlowState(Parcelable superState) {
            super(superState);
        }
        @Override
        public void writeToParcel(Parcel out, int flags) {
            super.writeToParcel(out, flags);
            out.writeInt(columnSpace);
            out.writeInt(rowSpace);
            out.writeInt(maxLines);
        }
    }
}
案例-网格布局(GridLayout)

*
自定义属性
<resources>
        <!-- 自定义空View控件相关属性 -->
    <declare-styleable name="GridLayout">
        <!-- 水平间距 -->
        <attr name="grdColumnSpace" format="dimension" />
        <!-- 垂直间距 -->
        <attr name="grdRowSpace" format="dimension" />
        <!-- 列数 -->
        <attr name="grdColumnCount" format="integer" />
        <!-- item 高 : 宽 -->
        <attr name="grdRadio" format="float"/>
        <!-- item 高度 -->
        <attr name="grdItemHeight" format="dimension"/>
    </declare-styleable>
</resources>
GridLayout(流程都差不多, 不详细注释了)
public class GridLayout extends ViewGroup {
    protected int columnSpace, rowSpace, columnCount, itemHeight;
    protected float grdRadio;
    public GridLayout(Context context) {
        this(context, null);
    }
    public GridLayout(Context context, AttributeSet attrs) {
        this(context, attrs, 0);
    }
    public GridLayout(Context context, AttributeSet attrs, int defStyleAttr) {
        super(context, attrs, defStyleAttr);
        TypedArray a = context.obtainStyledAttributes(attrs, R.styleable.GridLayout);
        columnSpace = a.getDimensionPixelSize(R.styleable.GridLayout_grdColumnSpace, dip2px(10));
        rowSpace = a.getDimensionPixelSize(R.styleable.GridLayout_grdRowSpace, dip2px(5));
        columnCount = a.getInt(R.styleable.GridLayout_grdColumnCount, 1);
        itemHeight = a.getDimensionPixelSize(R.styleable.GridLayout_grdItemHeight, 0);
        grdRadio = a.getFloat(R.styleable.GridLayout_grdRadio, 1F);
        a.recycle();
    }
    public int dip2px(float dpValue) {
        final float scale = getContext().getResources().getDisplayMetrics().density;
        return (int) (dpValue * scale + 0.5f);
    }
    @Override
    protected void onMeasure(int widthMeasureSpec, int heightMeasureSpec) {
        super.onMeasure(widthMeasureSpec, heightMeasureSpec);
        int childCount = getChildCount();
        if (childCount > 0) {
            int pl = getPaddingLeft();
            int pt = getPaddingTop();
            int pr = getPaddingRight();
            int pb = getPaddingBottom();
            int width = resolveSize(getMeasuredWidth(), widthMeasureSpec);
            // 强制设置所有 子View 的宽度
            int childWidth = columnCount <= 1 ? width - pl - pr : (width - pl - pr - (columnCount - 1) * columnSpace) / columnCount;
            // 设置子View的高度
            int childHeight = itemHeight > 0 ? itemHeight : (int) (childWidth * grdRadio);
            View child;
            for (int i = 0; i < childCount; i++) {
                child = getChildAt(i);
                // 既然已经强制设置了宽高, 直接测量即可
                child.measure(MeasureSpec.makeMeasureSpec(childWidth, MeasureSpec.EXACTLY), MeasureSpec.makeMeasureSpec(childHeight, MeasureSpec.EXACTLY));
            }
            int rows = columnCount <= 1 ? childCount : (int) Math.ceil(childCount * 1.0 / columnCount);
            setMeasuredDimension(MeasureSpec.makeMeasureSpec(width, MeasureSpec.EXACTLY), MeasureSpec.makeMeasureSpec(pt + pb + rows * childHeight + (rows - 1) * rowSpace, MeasureSpec.EXACTLY));
        }
    }
    @Override
    protected void onLayout(boolean changed, int l, int t, int r, int b) {
        int childCount = getChildCount();
        if (childCount > 0) {
            int pl = getPaddingLeft(), pt = getPaddingTop();
            View child;
            int childWidth, childHeight, cIndex, rIndex, left, top;
            for (int i = 0; i < childCount; i++) {
                cIndex = columnCount <= 1 ? 0 : i % columnCount;
                rIndex = columnCount <= 1 ? i : i / columnCount;
                child = getChildAt(i);
                childWidth = child.getMeasuredWidth();
                childHeight = child.getMeasuredHeight();
                left = pl + cIndex * (columnSpace + childWidth);
                top = pt + rIndex * (rowSpace + childHeight);
                child.layout(left, top, left + childWidth, top + childHeight);
            }
        }
    }
}
通过上面两个例子, 可以简单的总结下自定义ViewGroup的常规套路:
- 重写 onMeasure(), 测量子VIew, 最后再根据具体要求计算自己的宽高
- 重写 onLayout(), 根据要求对子View进行布局
如何支持Margin
事实上上面的写法在一般情况下使用都没什么问题. 不过我们在测量和布局的时候, 都忽略子View的一个非常重要的属性 Margin. 如果要考虑Margin的影响, 那么需要完成以下步骤:
- 重写ViewGroup中三个关于LayoutParams的方法
@Override protected LayoutParams generateLayoutParams(LayoutParams p) { return new MarginLayoutParams(p); } @Override public LayoutParams generateLayoutParams(AttributeSet attrs) { return new MarginLayoutParams(getContext(), attrs); } @Override protected LayoutParams generateDefaultLayoutParams() { return new MarginLayoutParams(LayoutParams.WRAP_CONTENT, LayoutParams.WRAP_CONTENT); } - 修改测量逻辑
- 改 measureChild() 用 measureChildWithMargins()
- 在测量计算中, 要考虑margin的影响:
MarginLayoutParams lp = (MarginLayoutParams) child.getLayoutParams();
int childWidth = child.getMeasuredWidth() + lp.leftMargin + lp.rightMargin;
...
- 修改布局逻辑(代码略)
完!


